Would you like to know how to add rich snippets to WordPress content?
Rich snippets are a powerful way to increase your visibility on SERPs, boost your clickthrough rates (CTRs), and drive more traffic to your site.
In this article, we’ll show you how to add rich snippets in WordPress. Yes, even if you have no technical or coding skills.
In This Article
What Are Rich Snippets?
Rich snippets are the rich results that Google displays in search, which include additional information like star ratings, prices, and more depending on the type of schema markup applied.
In other words, they are more prominent nice-looking search results that give direct information to users about what a page is about.
Here’s an example of a rich snippet that Google displays when Product schema is added to your site:

As you can see, it shows star ratings, the number of votes, and the price. This gives people the sneak peek they’ll need to decide if they want to see more information about the product and click through to your site.
Best of all, your product listing gets more noticeable in searches, so you’re likely to drive more organic traffic to your site and increase sales.
Rich snippets also help with other aspects of SEO, like voice search. For instance, research shows that 40.7% of all answers to voice searches are pulled from a featured snippet.
How to Create Rich Snippets?
Google rich snippets are created by adding schema markup to your web pages. We’ll show you how to easily do this in the section add rich snippets to WordPress the easy way. But first, let’s explain what schema markup is.
Schema markup (also called structured data) is used by all big search engines like Google, Bing, Yahoo, and Yandex to show additional information (rich snippets) in their search results. It’s the code that tells Google what your content is about.
So to put this simply, while rich snippets are for humans and make your content look more appealing in the search results, schema markup is for search engine bots.
What Can You Add Rich Snippets To?
You can add rich snippets (or schema markup) to:
- Articles
- Events
- Reviews
- Recipes
- Books
- Products
- FAQs
- And much more
To check out how some of these nice-looking Google rich snippets can look, here’s an example of when Recipe schema markup is added to a site:
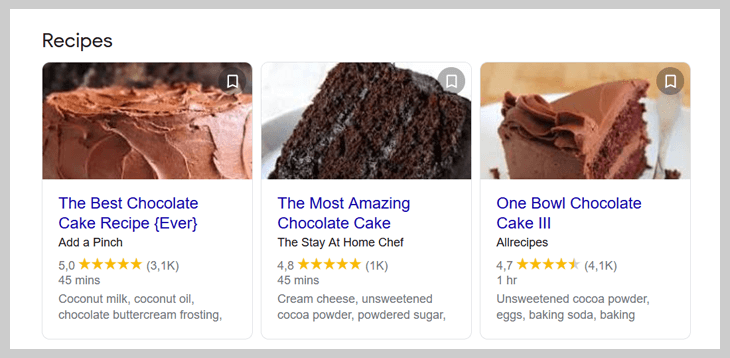
Who can resist these yummy rich snippets, right? We bet visitors can almost feel the creamy chocolate taste just by looking at these rich results. You’ll be more likely to attract visitors to your unique and tasty recipes when adding rich snippets to your site.
But it would be a shame to stop there…
…here’s another example of a rich snippet for FAQs:
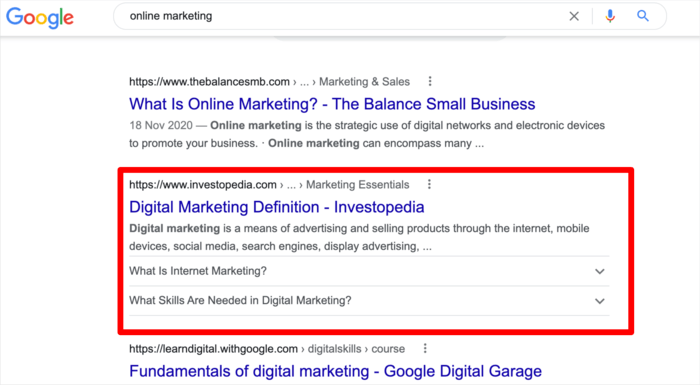
As you probably see from the above example, the FAQ rich snippets are useful for people searching for information and who need quick answers to their questions. They’ll show a collapsible list in the search results on Google, and when a question is clicked, the answer is displayed in a dropdown window.
Best of all, unlike most SEO changes, it doesn’t take months or years to see results from this. You can literally see results in less than 30 minutes.
With that said, let’s show you how to easily add rich snippets to WordPress.
How to Add Rich Snippets in WordPress (The Easy Way)
Ready to add rich snippets to your WordPress site?
Here’s a simple walkthrough of how you can do just that.
Step 1: Install All In One SEO (AIOSEO)
The easiest way to add rich snippets is to install a powerful SEO plugin like All In One SEO (AIOSEO).

AIOSEO is one of the best WordPress SEO plugins and boasts over 100 million downloads. It’s trusted by millions of savvy marketers to help them rank their sites and drive targeted traffic. This is because AIOSEO has many powerful features and modules designed to help you optimize your website for SEO.
One of the most loved features of the plugin is the revolutionary Schema Generator. This powerful module makes it easy for users to add schema markup to pages or posts, even without technical or coding knowledge.
For step-by-step instructions on how to install AIOSEO, check out our installation guide.
No matter the schema type you want to implement, AIOSEO makes it super easy. This is thanks to the rich schema catalog.
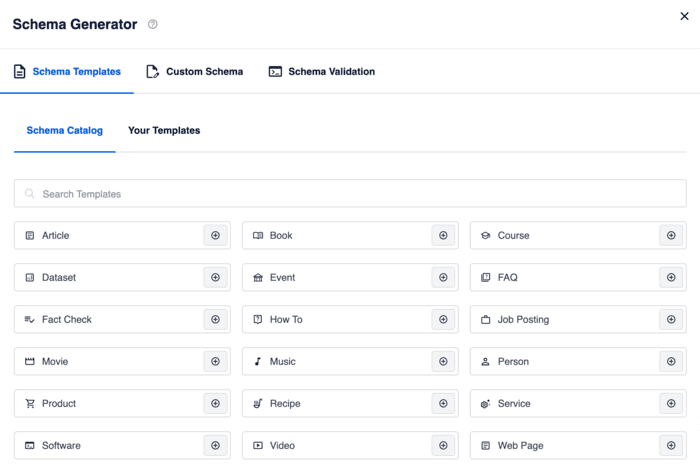
You must choose the relevant schema markup type for the particular page you’re editing. But more on that in a moment.
Step 2: Add Person or Organization Schema
After you’ve installed and activated AIOSEO, the next step to adding rich snippets in WordPress is to set your Person or Organization schema.
To do that, head to the All in One SEO menu, then click on Search Appearance. Next, go to the Global Settings tab and scroll down to the Knowledge Graph section.
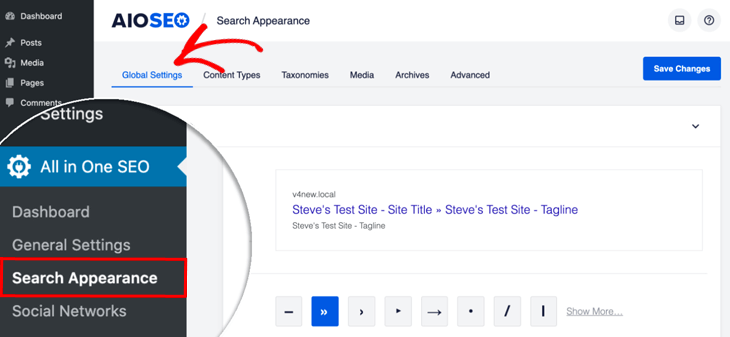
Once you’ve navigated to the Knowledge Graph section, the first thing you need to do is choose whether your site represents a Person or an Organization.

Based on what you choose, you’ll see fields where you need to enter your information.
For Organization, you need to enter the following information:
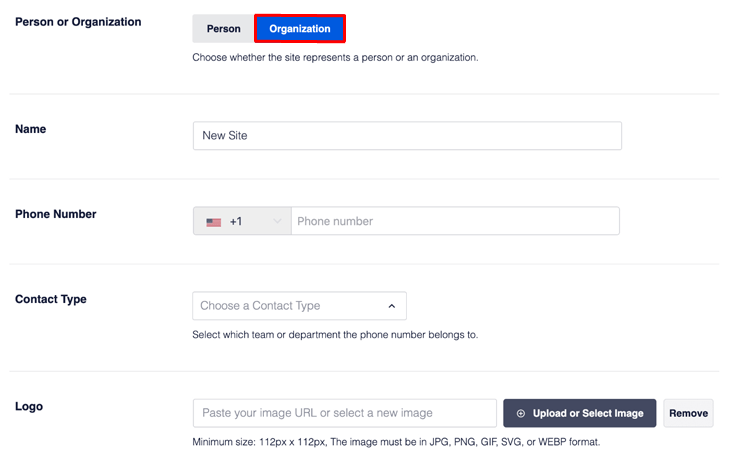
Note: The image has to be a minimum size of 112px x 112px and in jpg, png, or gif format. Also, if you don’t upload a logo, AIOSEO will use the logo that you added to your theme.
If you have a Personal site, you need to enter this information:
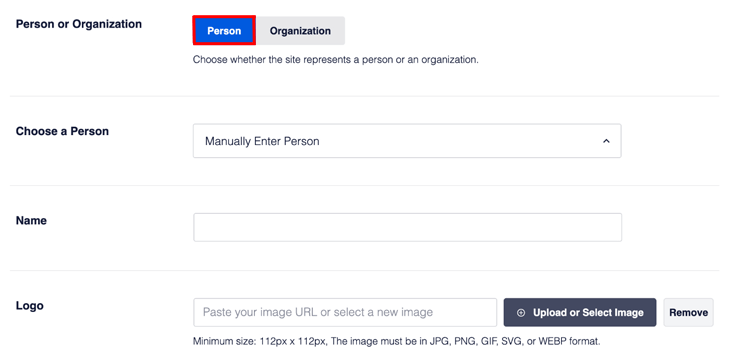
Adding Person or Organization schema is important as it helps build your knowledge graph. And if you run an online store, it also helps the rich snippet graph pull your seller information and add it to your snippets on SERPs.
Step 3: Add Rich Snippets to Your Content
To start with, you must navigate the All in One SEO menu and click on Search Appearance. The next step is to click on the Content Types tab.
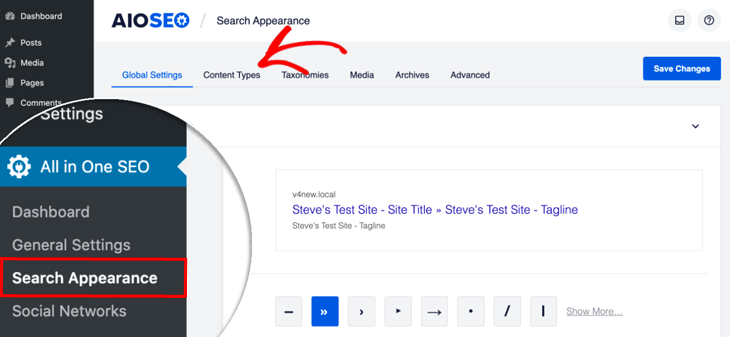
Here you’ll see sections for each type of content on your site, such as posts, pages, and products.
In this example, we’re going to add schema to your Posts. While in Posts, click on the Schema Markup to set schema for your Schema Type and Article Type.
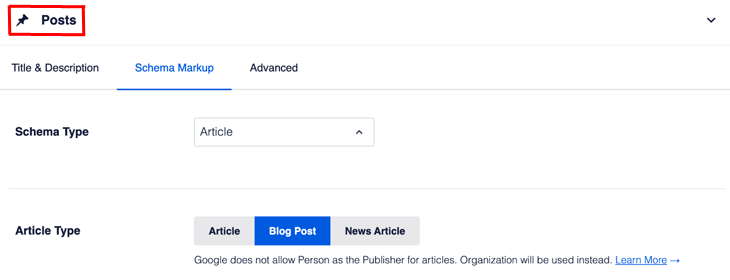
Make sure you have Article as Schema Type. It’s the best option for blog posts and news articles.
Below Schema Type, you’ll see a setting for Article Type. It’s set to Blog Post by default, but you can choose what fits your content the best.
You can repeat these steps for pages and products too.
Next, we’ll add rich snippets to your individual posts and pages.
Step 4: Add Rich Snippets to Individual Posts and Pages
Once you’ve added general sitewide schema markup, the next step is to add rich snippets to individual posts and pages.
Simply scroll down to the AIOSEO Settings at the bottom of your post or page, and click on the Schema tab. This will open the Schema Generator, where you can generate the Schema Type to add to your page.
By default, the schema type is set to Article — Blog Post.
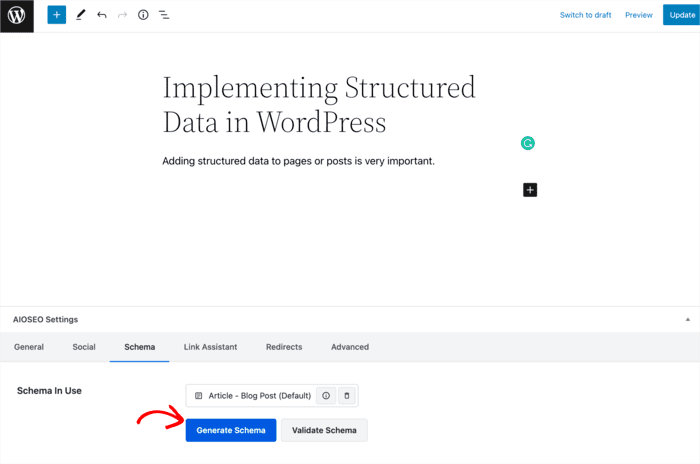
Next, click on the Generate Schema button to select and optimize your schema type. Doing so will open up the Schema Catalog, where you can select the type of schema you want to implement.

Click on the + sign next to your schema type of choice to add it to your page. Doing so will open up a modal where you can input all the necessary information needed to generate accurate schema for your page.
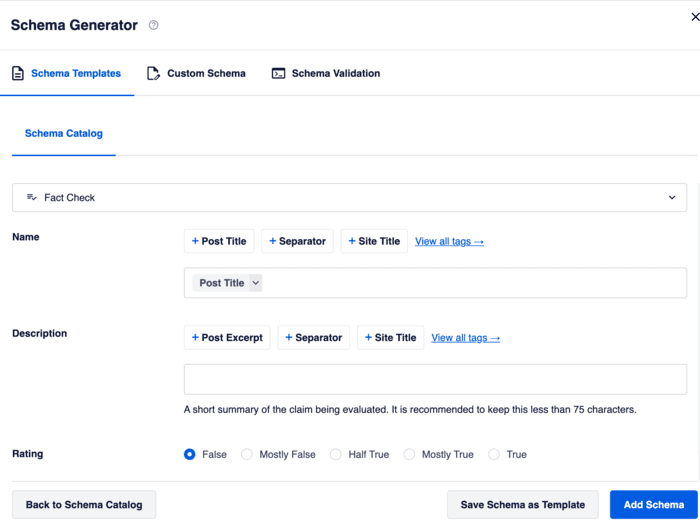
Once you’ve filled in the information, click the Add Schema button and your schema markup will be generated and added to your post or page.
Alternatively, you can click on the Save Schema as Template button to save the schema markup as a reusable template.
Adding Custom Schema Markup in WordPress
If the schema type you want to add is not available in our Schema Catalog, you can still use our Schema Generator to add it and output your desired rich snippets. To do that, click on Generate Schema » Custom Schema tab. Doing so will open a field where you can paste your custom schema code.
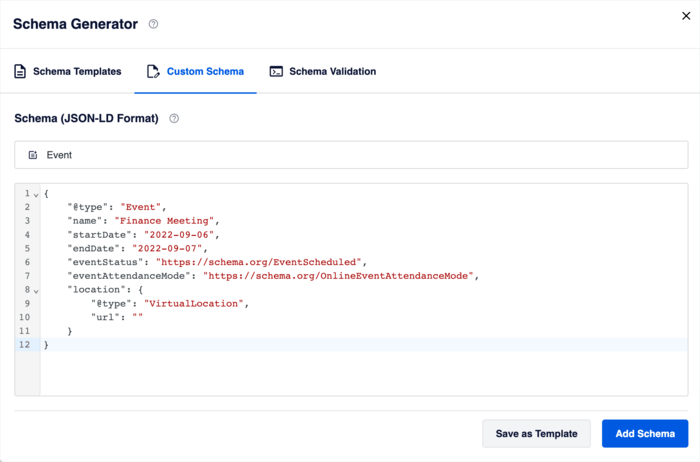
Don’t worry, if you have no coding knowledge you can simply use a 3rd party tool like JSON-LD Generator to create the schema code by inputting relevant information about your schema.
Simply paste the code in the custom schema generator and click on Add Schema or Save as Template if you want to reuse the schema type on other posts or pages.
And that’s it!
You’ve added rich snippets in WordPress without breaking a sweat.
We hope this post has helped you know how to add rich snippets to your WordPress website. Once you’re done, we’re sure you’ll also find our other resources helpful. An example is our tutorial on how to add an FAQ section in WordPress. You may also be interested in knowing how to easily add a table of contents block to your posts or pages.
If you found this article helpful, then please subscribe to our YouTube Channel. You’ll find many more helpful tutorials there. You can also follow us on Twitter, LinkedIn, or Facebook to stay in the loop.
Disclosure: Our content is reader-supported. This means if you click on some of our links, then we may earn a commission. We only recommend products that we believe will add value to our readers.

Hi, thank you for this amazing post. today’s question is I have a real estate website so “RealEstateListing” Schema is available.
SUPPORTED SCHEMA TYPES
1. Apartment
2. House
3. SingleFamilyResidence
Finally, this is support Real Estate Schema?.
Very useful, helpful and insightful writeup and post.