Did you know that social media drives 31.24% of traffic to websites? That’s why it’s important to integrate social media into your website, so you can use social proof as a way of strengthening your brand and grow your business.
In this post, we’ll show you how to integrate social media into your WordPress website without having to be a techie using 5 simple ways.
Here’s a quick overview of what we’ll cover in this post. Feel free to click on these quick links to jump straight to different sections:
In This Article
- 5 Ways to Integrate Social Media Into Your Website
- 1. Add Your Social Profiles to WordPress
- 2. Enable Facebook Thumbnails to Boost Engagement
- Enable Facebook Thumbnails in WordPress
- Setting Facebook Thumbnail on Individual Posts and Pages
- 3. Set Twitter Cards to Drive More Referral Traffic
- Setting Twitter Cards on Individual Posts and Pages
- 4. Embed a Social Media Review Widget on Your Site
- 5. Add YouTube Video Testimonials to Your Content
5 Ways to Integrate Social Media Into Your Website
There are multiple ways you can integrate social media on your WordPress website. And we’re going to show you 5 simple ways of doing just that:
1. Add Your Social Profiles to WordPress
Social media integration is important because it can strengthen your brand and grow your business. You’ll gain more visibility and can generate more leads for your business.
Also, by getting your visitors to follow you on different social channels, you can stay in touch with them and easily bring them back to your site.
With that said, the first step is to add your social media profiles to WordPress and let Google know about them. With AIOSEO, you can add up to 11 social media profiles, which will help you cover most social networks.
AIOSEO is a complete WordPress SEO plugin that lets you optimize your content for search engines and increase rankings with just a few clicks. It gives you access to all the powerful SEO tools and features you need to boost your SEO and dominate the search results.
To get started, simply navigate to Social Networks in the All in One SEO menu, and click on the Social Profiles tab.
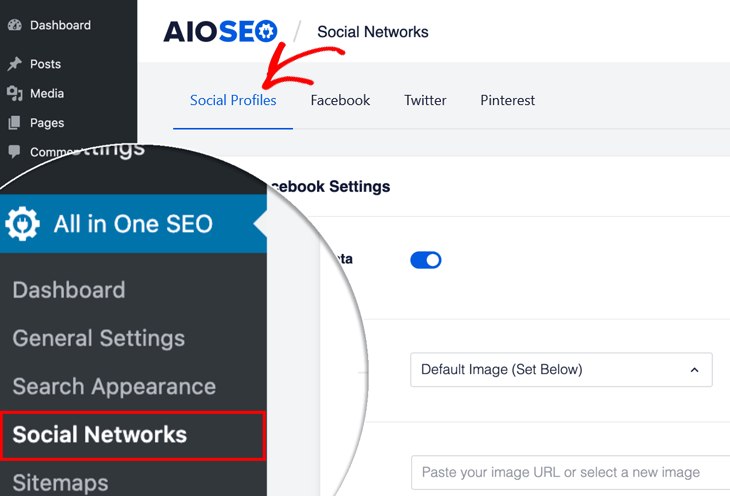
This will open a window, where you can add all your Social Profiles. Simply paste in the links to your social media networks.
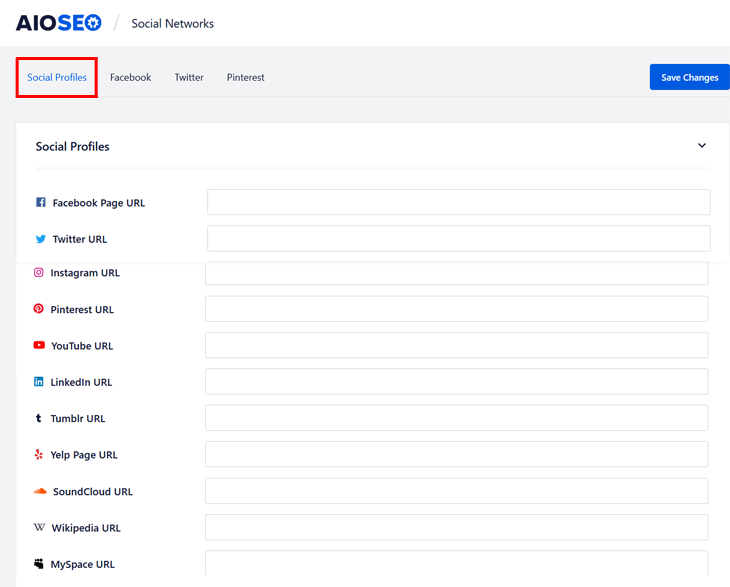
Once you’ve added your profiles, you click on the Save Changes button, and you’re all set!
The next step is to enable Facebook thumbnails and set Twitter Cards to boost engagement and drive more referral traffic to your website. Let’s show you how to easily do that next.
2. Enable Facebook Thumbnails to Boost Engagement
Did you know that posts with images get 39% more clicks and shares on Facebook? This means that more people are likely to click through to your website or share your content on Facebook.
It’s, therefore, important to make sure you’re showing the right Facebook thumbnail when your content is shared on Facebook.
Here’s an example of when we’ve set a Facebook thumbnail for one of our blog posts:
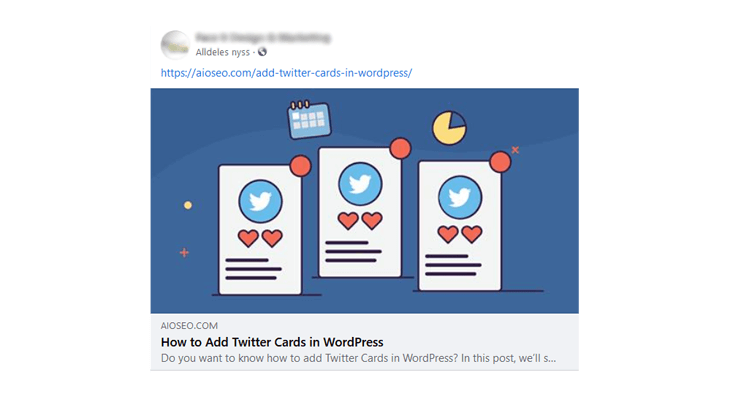
If you’re not setting a Facebook thumbnail for your content, Facebook usually “guesses” the image, and it may not get it right.
Alright, let’s get started by first enabling Facebook thumbnails on your WordPress website.
Enable Facebook Thumbnails in WordPress
To begin, go to Social Networks in the All in One SEO menu, and click on the Facebook tab.
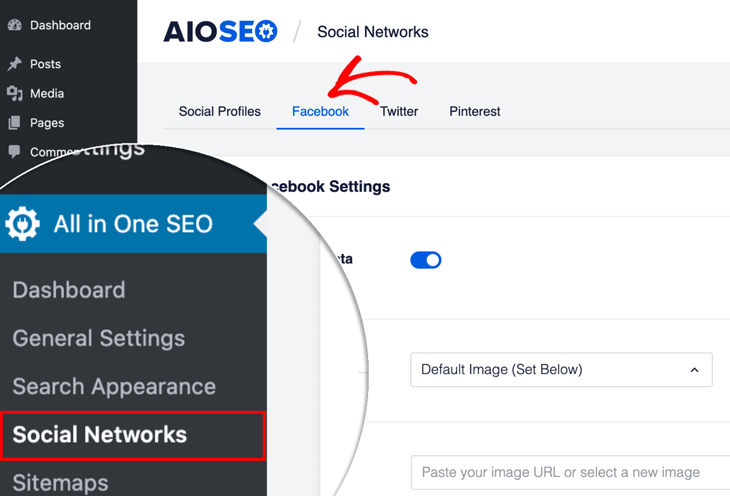
The first setting you’ll see is the Enable Open Graph Markup setting. Just make sure it’s enabled.
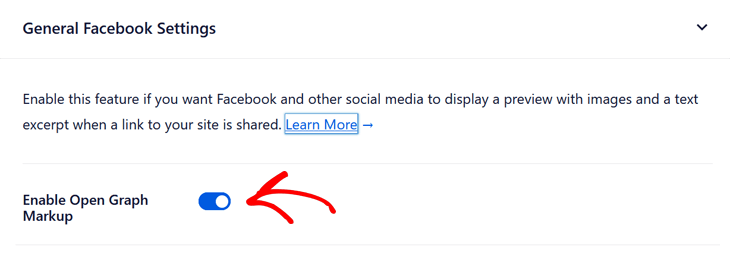
The next step is to choose which thumbnail that’s used when your content is shared on Facebook. And we’ll show you how to do that for your individual posts and pages.
If you want to set Facebook thumbnail for your default content, you can check out our post on how to fix the wrong Facebook thumbnail in WordPress.
Setting Facebook Thumbnail on Individual Posts and Pages
To get started, scroll down in the post or page you’re editing to the AIOSEO Settings, and then click on the Social tab.
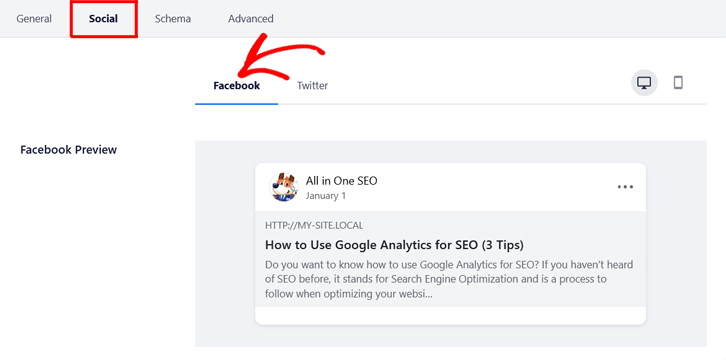
Next, click on the Facebook tab. This will open a new window, where you can add your Facebook Title and Description.
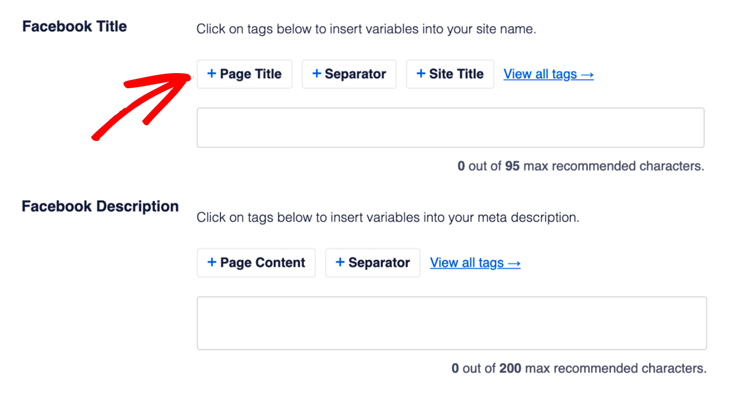
You can either write your own title and description or use the smart tags. For example, if you click on + Post Title, AIOSEO will automatically add your post or page’s title as Facebook title.
You can also type the hashtag character ( # ) in the field to display a list of available tags you can choose from.
Note: Remember to use a maximum of 70 characters for your title and 200 characters for your description.
Once you’ve added your Facebook title and description, you scroll down to the Image Source section. Click on the link, and it will display a drop-down menu with different Image Sources.
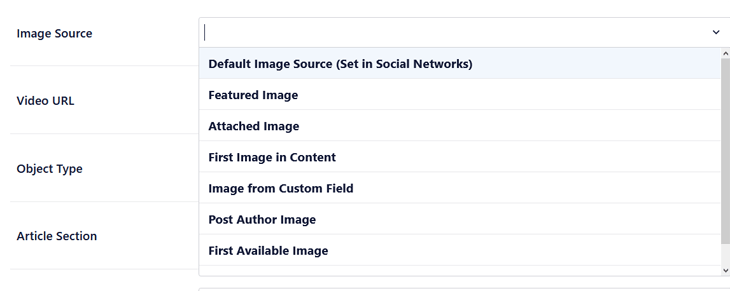
Here you can choose the source you want to add your image from. For instance, if you choose the option Default Image Source (Set in Social Networks), Facebook will show the thumbnail you set for your default content.
That’s it!
You’ve now enabled Facebook thumbnails on your WordPress website and set which image you want to show when your content is shared on Facebook.
Now, let’s move on to setting up your Twitter Cards to drive more referral traffic to your website.
3. Set Twitter Cards to Drive More Referral Traffic
Twitter Cards give you the power to share visual and engaging information to your followers without breaking the character limit and drive more referral traffic to your site.
They also let you control how your content looks when it’s shared on Twitter. In fact, you can pick the image and text that’s displayed, which means that more people will notice your content and click on it.
For instance, this is a Twitter Card when sharing WPBeginner’s post on how to start your own podcast on Twitter:
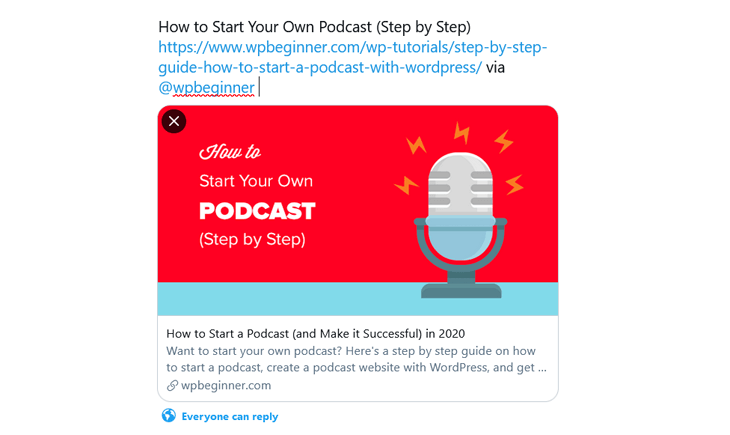
The large image makes it look visually appealing. And you can easily see what the content is about in the description. Without the image and description, fewer users would click on it.
You can also add video and audio content to increase your CTR (Click-Through-Rate) and shares even more.
Let’s show you how to set Twitter Cards for your individual posts and pages next.
Setting Twitter Cards on Individual Posts and Pages
When editing your blog post or page, simply scroll down to the AIOSEO Settings, and then click on the Social tab.
Then, click on the Twitter tab next to the Facebook tab.
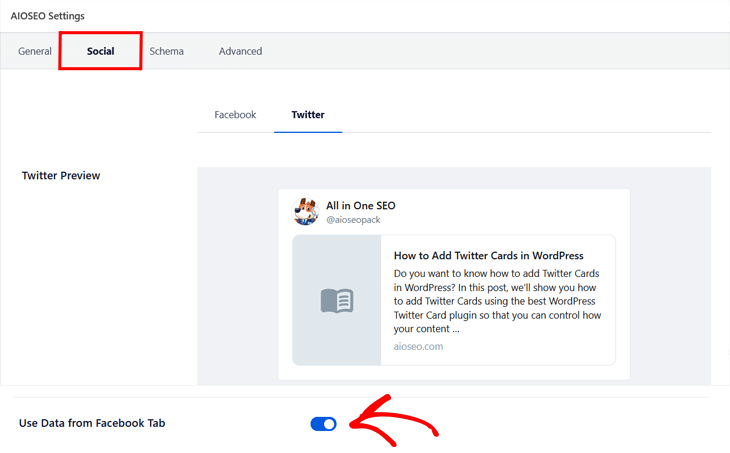
The option to Use Data from your Facebook Tab is set by default, but if you want to enter your own Twitter title and description, you can just uncheck this button.
If you do, it’ll open a new window, where you can add your Twitter Title and Description.
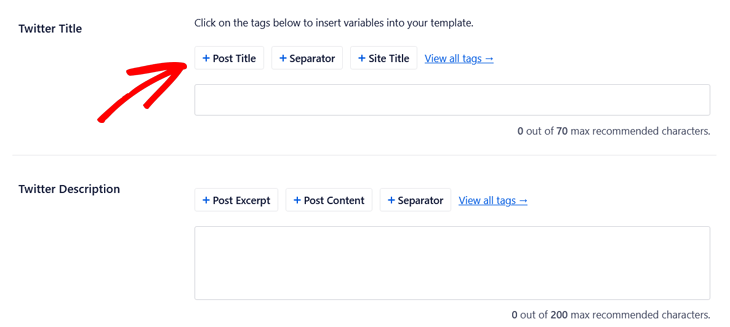
Here you can simply do the same procedure as for your Facebook title and description.
The next step is to choose what Twitter Card Type to use for your blog post or page.

If you’ve set Twitter Card for your default content, you can choose the Default (Set under Social Networks) option. For more details, please visit or guide on how to add Twitter Cards in WordPress the easy way.
If not, you can choose what Twitter Card you want to use. The Summary card displays a thumbnail image and the Summary with Large Image will show a large image for your content.
That’s it!
You’ve now set how your content will look like when it’s shared on Twitter, which will help boost your CTR and referral traffic.
Next, we’ll show you how to add a social media review widget to showcase your customer reviews so that you can use social proof to grow your brand.
4. Embed a Social Media Review Widget on Your Site
With the rise of social media accounts, there’s no reason for you to display faceless and nameless reviews on your website’s testimonials page.
Instead, you can use the power of social media to create positive social proof for your brand. And a good way of doing this is by embedding social media reviews on your site.
Here’s an example of Smash Balloon’s social media reviews feed on Twitter:
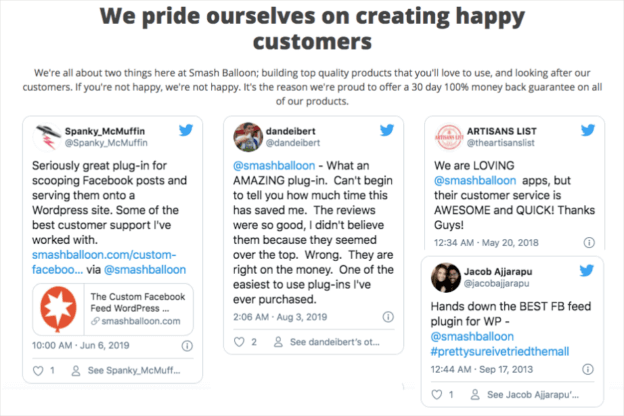
Using this social media feed on your testimonials page, you can display relevant tweets that mention your Twitter username to proudly present reviews from your happy customers.
The easiest way to do this is by using the Custom Twitter Feeds Pro by Smash Balloon. Check out this helpful tutorial on how you can add a mentions timeline to your website with just a few clicks.
And if your social media reviews are from Facebook, you can use the Custom Facebook Feed Pro plugin. It lets you embed real Facebook reviews on your WordPress sidebar, just like this:
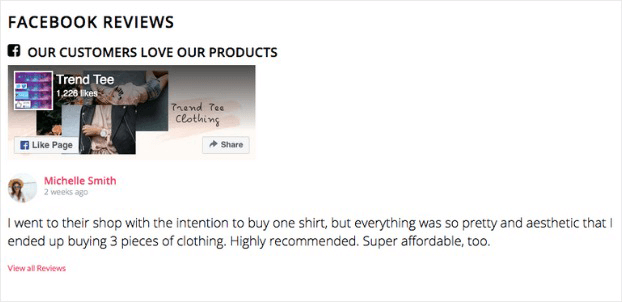
This will help you showcase your customer reviews as social proof. It’s super easy to set it up too! To learn how you can check out Smash Balloon’s tutorial on how you can add a social media review widget to WordPress.
5. Add YouTube Video Testimonials to Your Content
Adding YouTube video testimonials to your content is a great way to boost conversions and generate more sales for your business.
It’s also a popular marketing strategy because of how effective it is. After all, 80% of marketers confirm that videos helped increase sales for their brands.
For instance, here’s a selection of video testimonials for the best lead creation plugin for WordPress, OptinMonster:
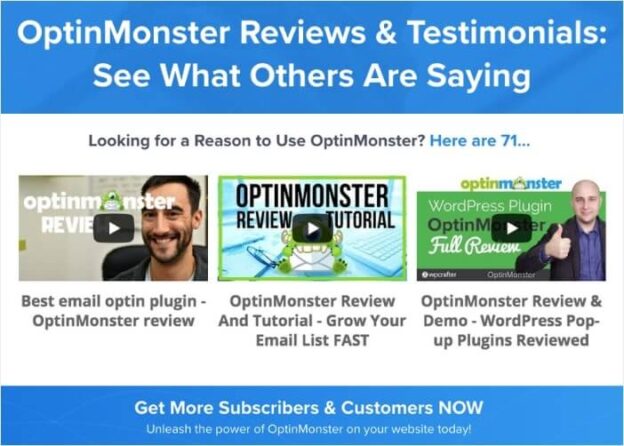
Watching these reviews will help new customers make a decision whether to try the plugin or not. The deal is that consumers are 83% more likely to trust peers over the brand itself, so video testimonials are a great way of establishing trust.
With the help of the Feeds for YouTube Pro plugin, you can easily embed YouTube videos on your site in 5 minutes tops. Just follow this beginner-friendly tutorial on how you can embed a YouTube gallery on WordPress, and you’ll have it set up before you know it.
There you have it!
You’ve now learned 5 ways to integrate social media into your website — easily and hassle-free, even if you’re not techie! Use these tips, and it’ll help drive more referral traffic to your website, boost engagement, and build your brand at rocket speed.
Before you go, check out 20 ultimate SEO tips to help boost your rankings or learn how to optimize your blog post and images to maximize your SEO.
Not using AIOSEO yet? What are you waiting for?
Disclosure: Our content is reader-supported. This means if you click on some of our links, then we may earn a commission. We only recommend products that we believe will add value to our readers.


Adding feed widgets depends on the theme.
Thank you for this. So helpful and easy to follow. Highfives!
You’re welcome! Glad you found the post helpful.