Do you want to know how to put your WordPress site in maintenance mode?
One fact that is certain concerning websites is that they’re constantly evolving. Some changes you make are so insignificant you can make them without visitors noticing. However, some changes are so drastic they require you put your website in maintenance mode.
If you don’t know what WordPress maintenance mode is and how to activate it, don’t worry. This article will not only explain what it is, but we’ll walk you through the steps you must take to put your site in maintenance mode.
In This Article
- What is WordPress Maintenance Mode?
- Why Do You Need to Know How to Put Your WordPress Site in Maintenance Mode?
- How to Put Your WordPress Site in Maintenance Mode the Easy Way: Use SeedProd
- How to Put Your WordPress Site in Maintenance Using WP Maintenance Mode
- How to Put Your WordPress Site in Maintenance Mode Using a Custom WordPress Function
- Now You Know How to Put Your WordPress Site in Maintenance Mode
What is WordPress Maintenance Mode?
WordPress maintenance mode refers to the status you put your website in when you’re making significant changes that can potentially break it or result in a bad experience for users. Usually, this means disabling some functions or blocking some pages. Unfortunately, this means users won’t get to access your website and, ultimately, the pages they were hoping to access, which can be inconvenient.
When you put your website in this state, users will be directed to a screen that explains your site’s status. Therefore, you should craft a clear message that explains why your site is in maintenance mode, when it will be back online, and what users should do in the meantime.
Why Do You Need to Know How to Put Your WordPress Site in Maintenance Mode?
There are several reasons why you need to know how to put your WordPress site in maintenance mode. Of course, the primary one is that you’re carrying out significant changes on your website, a great example being when you’re moving to a new hosting company.
Maintain Your SEO Wins
Taking your site offline during maintenance can lead to 404 errors. This is because taking it offline results in all links on your site being broken. These 404 errors can lead to a drop in search rankings and visibility. It could also lead to Google de-indexing your site.
Putting your website in maintenance mode lets you pass a 503 status to search engines. They’ll know that your site is temporarily down, but you’re working on it. Because of this, they won’t crawl your site or index your pages until you’re back online. Maintenance mode effectively helps you preserve all your SEO wins as search engines will not penalize you for broken links and other errors.
Reputation Management
Another reason to put your site in maintenance mode is that it will help you avoid getting a bad reputation. People may lose trust in your business when they land on a site that looks broken. Even if they’re regular visitors, being met by errors on your website will leave a bad impression.
Minimize Security Risks
Besides the user experience factor, putting your website in maintenance mode also helps minimize security risks. Particularly if you’re working on security-related bug fixes, keeping traffic at a bare minimum on your site will help ensure both you and your users are safe from malicious agents.
Putting your website in maintenance mode when carrying out changes that affect users should never be taken for granted. It’s an important step that helps you build stronger relationships with your website visitors. It’s also a great way to show that you’re professional. It will also prove that you care about your users.
How to Put Your WordPress Site in Maintenance Mode the Easy Way: Use SeedProd
Ready to learn how to put your WordPress site in maintenance mode?
Thankfully, it’s easier than you think, especially since many plugins can help you do that. The best part, you don’t even need to write a single line of code.
You simply need an easy-to-use plugin.
One of the best ways to put your WordPress site in maintenance mode is using a plugin like SeedProd. It’s also the easiest.

SeedProd started as a simple coming soon page. But it has grown into a powerful WordPress page builder that you can use to build different types of pages in WordPress. It’s also an excellent tool for putting your WordPress site in maintenance mode.
You may need the paid version of SeedProd for advanced features like premium templates, advanced customization features, and marketing integrations. However, the free version is all you need to put your website in maintenance mode.
How do you use SeedProd to put your website in maintenance mode?
First, you have to install and activate the plugin. Once that’s done, head over to your SeedProd settings, select “Pages,” then click on “Set Up a Maintenance Mode Page.”
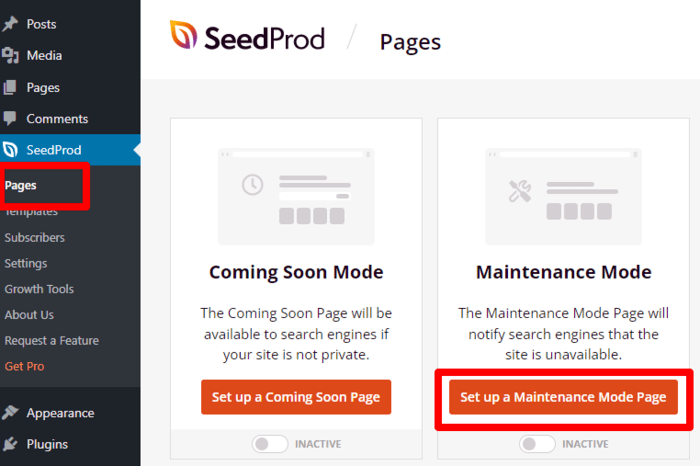
Next, the setup wizard will take you to a page where you can customize the maintenance page visitors will see when you enable maintenance mode. You’ll have to choose from SeedProd’s list of templates to get started. You can also choose to build your page from scratch.

Clicking on the blank canvas or the template of your choice will open up SeedProd’s page builder. This is where you’ll customize all the elements on your maintenance page.
You can easily add new content elements by adding new blocks from the left panel. For example, you can add:
- Custom logo or background
- Email sign up form
- Social sharing buttons
- Countdown timer
The design possibilities are endless, especially if you’re using the paid version of the plugin. Of course, you’ll also need other plugins, like WPForms, to add functionality to your custom blocks.
Once you’re done with customizing your page, click the “Save” button, and you have yourself a beautiful custom maintenance page.
The final step is to activate the WordPress maintenance mode. To do this, go to the “Pages” section of your SeedProd settings. Here, you’ll find your pages, including your maintenance page. Set the toggle at the bottom of the page to “Active,” and you would have put your site in maintenance mode.
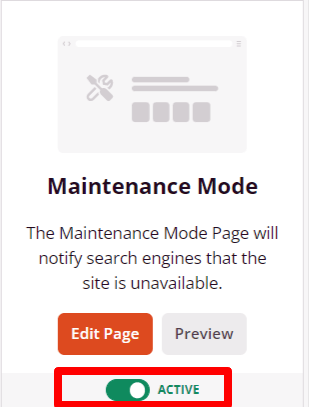
Finally, test to see if your website’s maintenance mode is working properly. Do this by visiting your website, preferably in incognito mode.
Does Maintenance Mode Mean no Activity or Business?
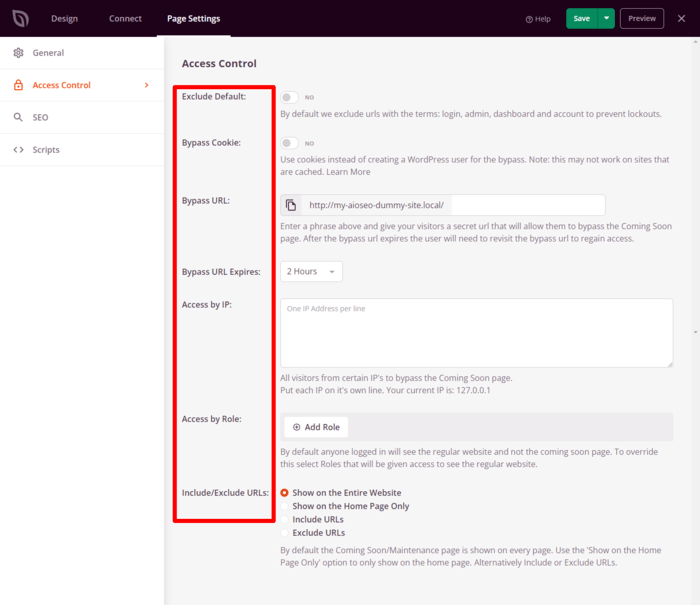
Thankfully, putting your site in maintenance mode doesn’t always mean having to halt all activity on your website. With tools like SeedProd, you can enable special configurations where you can:
- Allow certain activities to continue
- Grant logged in users access to the site
- Exclude certain pages from going offline
You can control the above configurations of your maintenance mode by going to the “Page Settings” option of SeedProd. Here, you’ll find the various controls you can put in place for your maintenance page.
Another cool feature you’ll find with SeedProd is the redirect function. If you want to send visitors to a particular page instead of just the maintenance page, you can set up a 302 redirect to another page of your choice.

This helps ensure you don’t miss out on any traffic destined for your website.
Disabling Maintenance Mode in SeedProd
Once you’re done with your site maintenance, you’ll want to disable maintenance mode. To do so, head over to your SeedProd dashboard and click on “Landing Pages” or “Pages” if you’re using the Lite version.
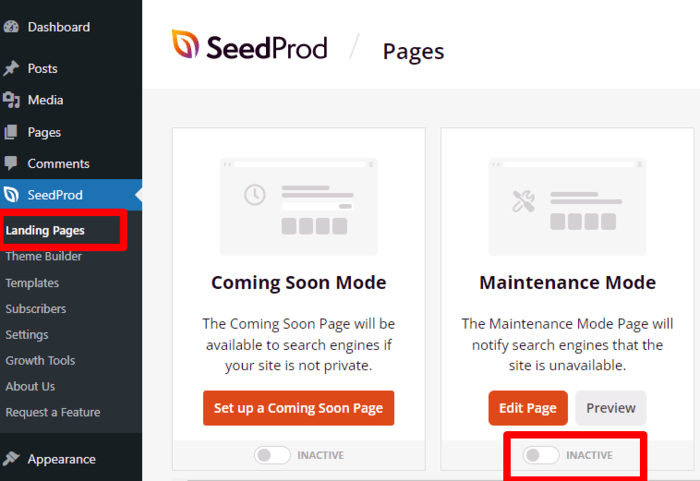
Simply toggle the maintenance mode switch from active to inactive, and that’s it. The public can now access your site.
How to Put Your WordPress Site in Maintenance Using WP Maintenance Mode
WP Maintenance Mode is another easy-to-use plugin you can use to put your website in maintenance mode. While not as powerful as SeedProd, it can still get the job done, but with a bit of extra work.
As always, you have to install the plugin first. After installing the plugin, head over to Settings in your WordPress dashboard and select WP Maintenance Mode.
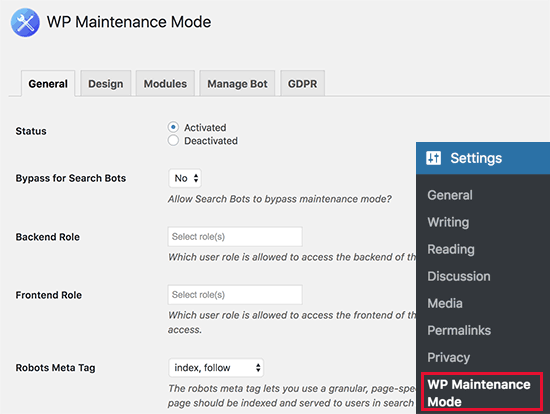
This will bring you to the “General” settings tab, where you’ll find an option called “Status.” It will be set to “Deactivated” by default. To put your website in maintenance mode, you have to set it to “Activated.”
The next option under “Status” is the “Bypass for Search Bots” option. Setting it to “Yes” allows search engines to bypass maintenance mode and continue indexing your website. Other settings include access control and the ability to define user roles.
Creating a Splash Page for Your Maintenance Page
A great feature you’ll love with WP Maintenance Mode is that you can easily create a beautiful maintenance page.
With all your maintenance mode settings configured, you can now move to the “Design” tab. Here you’ll find options for customizing the page visitors will land on when they try visiting your website.
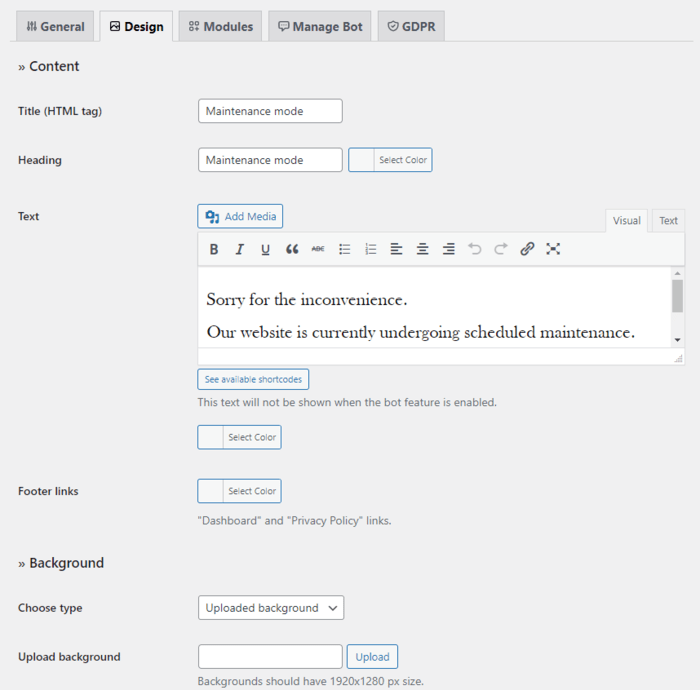
You can fill in the details of your maintenance page, including the background type and footer links on this page. Once done, click save, and your page design will be complete.
Adding Modules to Your Maintenance Page in Wp Maintenance Mode
Besides the message telling visitors that your website is undergoing work, you can add two modules to your maintenance page. The first module you can add is a countdown timer, while the second is a newsletter signup form.
How to Put Your WordPress Site in Maintenance Mode Using a Custom WordPress Function
Using custom functions is not a recommended method for beginners. If you’re not comfortable messing around with code, you’re better off using code-free plugins like SeedProd.
How do you create a custom function to put your WordPress website in maintenance mode?
First things first, backup up your website if something goes wrong and it breaks. After all, safety first. After you’ve backed up your site, you can start editing your WordPress functions.php file to activate maintenance mode. To do that, navigate to “Appearance” in your WordPress dashboard. Under “Appearance”, click on “Theme File Editor” and look for your functions.php file.

To put your site in maintenance mode, add the following code snippet at the end of the file:

You can customize the maintenance mode headline by editing the quoted text on line 4:
wp_die('<h1>Under Maintenance</h1><br />Website under planned maintenance. Please check back later.');Save your changes by clicking “Update File,” and your website will be put in maintenance mode.
While this method serves its purpose of putting your website in maintenance mode, it has the drawback of not affording you the marketing opportunities plugins like SeedProd offer.
Now You Know How to Put Your WordPress Site in Maintenance Mode
A website is a living document. Because of that, you’re bound to regularly make many changes to it. When the changes are significant, you’ll have to put it in maintenance mode. Use any of the methods outlined above to do just that.
However, whether you’re a novice or expert, we recommend you go the SeedProd way. It’s easier, faster, and allows you to keep your visitors engaged while you’re working on your site.
While you’re working on your site, don’t forget to up your SEO game as well. There’s also an easy-to-use no-code plugin for that — it’s called AIOSEO. With AIOSEO you can optimize for on-page SEO and some technical SEO aspects like sitemaps, schema markup, redirects, and more.
Go ahead and download AIOSEO today and optimize your SEO as you work on other aspects of your website.
Disclosure: Our content is reader-supported. This means if you click on some of our links, then we may earn a commission. We only recommend products that we believe will add value to our readers.
